@Yahoo account deleted. Just not worth it any more.
Goodbye!
@Yahoo account deleted. Just not worth it any more.
Goodbye!
 Since Facebook introduced the data-harvesting ‘Continuously Upload Contacts’ feature in settings, a change has occurred in the background (the Facebook API, for those inclined..) which prevents you downloading your friend list via a trusted 3rd party app.
In addition, the Facebook app itself no longer supports the older style ‘contact sync’ properly (or at all) on both Android and iOS.
In addition (and YMMV), the calendar sync no longer seems to work either. There is a workaround you can follow (link beneath), to create a Google calendar which syncs your Facebook contacts’ birthdays – and this is the primary reason for my post.
I used to rely on the app syncing calendar events to my phone, so that I could see at a glance whose birthday it is and send them my best wishes, but I’ve missed a few recently and now I know why.
I’m starting to wonder what benefit the native Android/iOS app is these days, versus good old mobile website access. I’m going to ditch the FB app on Android and start using ‘Tinfoil for Facebook’ instead, which looks and feels very similar but does away with the bloated spyware that the official app has become.
How to Create a Contact Birthday Calendar:
http://www.stechguide.com/
Tinfoil for Facebook:
https://play.google.com/
iOS users can always ‘Save to Homescreen’ from mobile Safari when visiting facebook.com.
[ This is a retrospective publication ]
It takes heroes like Edward Snowden to reveal how malicious governments can become. The Snowden revelations during the summer of 2013 showed that not only does everyone have to be wary of internet-based “threats”, but that those threats could be in the form of legally-appointed agencies seeking to catch out anyone who accidentally clicks something they shouldn’t.
Worryingly, despite the big players’ assurances of high levels of security, a post on Ars Technica discusses (and links to) slides created by the NSA, and leaked by Snowden, showing how Google’s international internet traffic was intercepted, analysed and understood – for a variety of its services. Thankfully, more heroes have recently stepped forwards with updates of their own.
My heroes today are +Brandon Downey and +Mike Hearn, who have voiced their contempt for the authoritarian misuse of power with, as we like to call it, the two-fingered salute (this would be one finger in the US…).
Google, too, has a data-collection objective
Let us not forget who Google is and what it does. Yes, while its employees might be upset that their systems’ security has been brought into question, their employer’s mission “is to organize the world’s information and make it universally accessible and useful”. So Google, too, has a data-collection objective.
The good thing about the Snowden revelations, if indeed any of them can be “good”, is that it has revealed how much work still needs to be done and how much we assume our data won’t be intercepted and inspected. It’s no longer safe to think like that, and the use of encryption should be mandatory between two end-points.
But now that the larger players are catching up with better security implementations, who is there to help the smaller players? Running a hosting outfit myself, I know how much time is required to stay informed with regards to common exploits and vulnerabilities, as well as implementing working solutions when certain zero-day exploits are revealed. Every internet service provider, hosting company and other entity transacting business via the internet has a responsibility towards safeguarding confidential data. How many take it seriously enough?
It’s time the larger players stepped up and started working collectively in a security community designed to help the smaller players in the market, rather than try to pwn the market itself; if that were to happen, the purpose of the internet would be destroyed and the argument moot.
There is a growing trend amongst internet companies – i.e. those organisations who provide services over the internet which store your data – to proclaim your freedom and control over your data. Sometimes, the reality doesn’t quite bear up.
I have decided to write an ad-hoc series of blog posts treating this subject. My main area of focus will be how to use readily-available tools to help you liberate your data and regain control over it.
Keep an eye on my series, at https://dowe.uk/tag/data-liberation – and subscribe by email if you want to be kept up-to-date with the latest posts.
Initial plans
The main subjects I am planning to write about at this stage revolve around the current internet/mobile ecosystem and what you can do to live a productive life while maintaining security.
My outline of topics so far:
– why do this? Benefits? – How to set up? – Basic steps for maximum security
As well as these practical how-tos, I’m also intending to cover the bigger picture in a few supporting articles:
– what YOU can do to ensure your rights are not being violated – being pro-active and helping in the community
With writing in mind…
If you would like to suggest ideas or subject areas that you would like covered, please get in touch.
I look forward to your comments!
This post has a new edition.
Part #1 of the Data Liberation series
Although Google Chrome is a very fast browser, it lacks one key feature which seems designed to lock users in – any account migration facilities to support moving to other browsers. This post is intended to help you move your saved passwords from Chrome to Firefox.
Firstly, you’ll need to have a read of this page: http://blog.catoblepa.org/2012/08/linux-how-to-export-google-chrome_28.html – then come back here for more info!
While following the instructions in that post, take note of these steps below before you close your browser. If you have also set up a separate encryption password for your browser, don’t worry – this method still allows access.
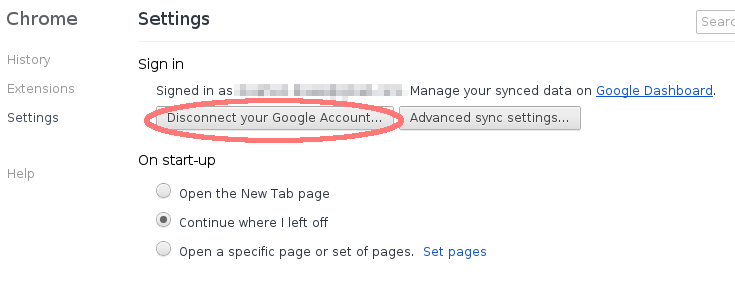
In Chrome settings, as a precation, I disconnected my Google account before closing the browser. Therefore, any changes I could make to this temporary session wouldn’t ever be uploaded back to Google.
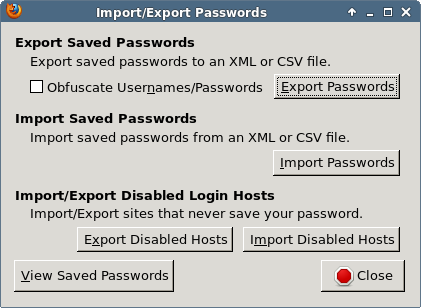
Password Exporter allows you to import passwords too, so you can avoid the need to install any third-party workarounds like LastPass (which again require you to upload all your browser data).Firstly, though, using Password Exporter in Firefox (Tools > Add ons … Extensions > Password Exporter > Preferences), we can export a sample CSV file to see how Password Exporter expects its import data. Simply click “Export Passwords” and save the file to your home directory.
NOTE: This requires that at least one password is saved in Firefox already.
hostname username password formSubmitURL httpRealm usernameField passwordField
This is the format that Password Exporter will expect its import data.
The data’s headings that you have just exported from Chrome are a little different:
origin_url action_url username_element username_value password_element password_value submit_element signon_realm ssl_valid preferred date_created blacklisted_by_user scheme password_type possible_usernames times_used
We need to match up the firefox CSV headings with the corresponding Chrome CSV headings. To do this quickly, use a spreadsheet tool I used LibreOffice Calc.
This is what I arrived at:
(FF = Firefox; GC = Google Chrome)
FF: hostname username password formSubmitURL httpRealm usernameField passwordField

GC: origin_url username_value password_value action_url signon_realm username_element password_element
Once the fields are mapped, there’s a couple more important steps to undertake.
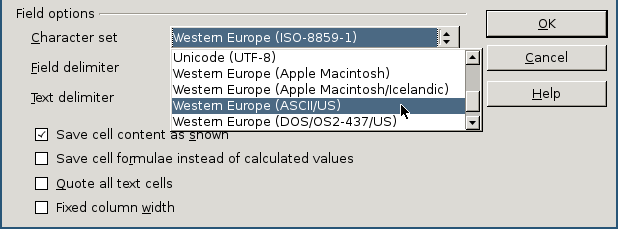
Firstly, when you come to exporting from your spreadsheet application, make sure you choose to edit the output filter. In the Export Text File dialog, make sure “Quote all text cells” does not have a check (tick) in the box.
For good measure, I also selected ASCII/US in encoding type, as that is the format used by Password Exporter when exporting. I think the importer should handle ISO-8859-1 and/or UTF-8, but your mileage may vary.
Now export it.
Remember seeing the additional header in the exported CSV file? It might have looked something like this:
# Generated by Password Exporter; Export format 1.1; Encrypted: false
In order to tell Password Exporter what format to expect its data in, this heading needs to be added back. However… the best way to do this is via a text editor, not in a spreadsheet program.
Open up GEdit, Emacs, Vi… whatever. Add that line to the top, but remove any trailing commas! It should now look like this:
# Generated by Password Exporter; Export format 1.0.4; Encrypted: false
"hostname","username","password","formSubmitURL","httpRealm","usernameField","passwordField"
One more step before you import!
A side-effect of exporting your CSV in LibreOffice is that empty cells are not quoted. In other words, the comma-separated values may appear like this:
"someusername","somepassword","someUrl",,"someusernameField"Did you see those two commas with nothing between? The Password Exporter won’t like that when trying to import, so do a quick search-and-replace:
Search for ,, and replace with ,””,
Finally, save the file. Again, ENSURE the file type is US/ASCII.
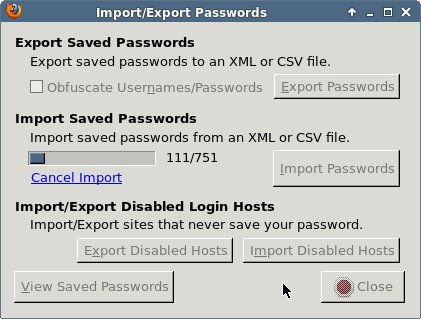
Now open up the Password Exporter dialog from Firefox and click Import Passwords – you should see progress in the dialog shortly.
CAVEAT #1: BUG WHEN IMPORTING v1.2-EXPORTED DATA
There is an import bug when the version header is declared as 1.1. However, you can get around this by “fudging” the import header to an older version (I used 1.0.4). If you have trouble importing, adjust your header in the file to look like this:
"hostname","username","password","formSubmitURL","httpRealm","usernameField","passwordField"After importing, you may see that not all passwords were imported. This is because duplicates are not imported. You can view the details in the link.
CAVEAT #2: SOME LOGINS, PASSWORDS, ETC ARE QUOTED
So far I’ve not had time to find a way around this. It’s to do with the import format.
The adventurous can investigate the source code, here: https://github.com/fligtar/password-exporter/blob/master/passwordexporter/chrome/content/pwdex-loginmanager.js
Hopefully you have now successfully liberated your passwords!
Problems? Comment below!
# mkdir /tmp/test# touch /tmp/test/hello.sh#!/bin/shHowever, you should be able to do # /tmp/test/hello.sh which outputs "Hello" as expected.
If you bump that world permission to r-x / 5, you would be able to see that file because ls has the necessary permission to read the directory contents.
Google is undoubtedly suffering from some adverse PR in respect of its new privacy policy. While it may have considered itself on to a PR “winner” with its “privacy made simple” approach, there has been considerable backlash in opinion and re-consideration of the use of its services.
So, what could Google do to demonstrate that it still takes on-line security seriously?
How about setting up its own Certificate Authority, and issuing free SSL certificates?
Google has the infrastructure, manpower and, I’d argue, interest in doing such a thing. In fact, in many ways, it already offers the flesh around this missing skeleton.
Perhaps it could support the CACert effort with funding and enough energy to get it through the audits required to have their root certificate included in Mozilla’s Firefox, as-shipped? And, while Google are at it (restoring their image of benevolence, that is), they could include that root certificate in Chrome too.
Just saying…
Scammers rely on your ignorance in order to fool you into clicking on their link and typically entering your bank details.
Don’t let them!
DISCLAIMER: DO NOT TRY TO VISIT THE EXAMPLE SCAM LINK GIVEN IN THIS POST. YOU ALONE ARE RESPONSIBLE FOR YOUR ACTIONS.
When you receive a link in an email, you should analyse that link to determine the authenticity and legitimacy of that link, before you click on it.
I was recently forwarded a scam email to analyse. If you have recently received a suspicious email with a link, here’s how to analyse that link.
Firstly, hover the mouse pointer over that link. At the bottom of your email window (commonly called the status bar), you should see a web address appear.
In this example, a link was received purporting to be from the UK bank Cahoot. But the link address is suspicious – so let’s analyse it…
http://ip270-c6.gi.digl.pl:8887/securebank.cahoot.com/servlet/com.aquariussecurity.bks.security.authentication.servlet.LoginEntryServletBKS/
… the bit in bold is what you’re interested in. The rest is not really of interest. However, when you come to inspect a link in the future, it’s worth knowing the following:
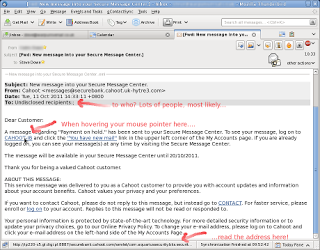 |
| How to analyse a link in Thunderbird (click for larger image) |
This means the protocol that your browser will use. A secure, encrypted browser connection begins https:// ; therefore, the link above will be unencrypted (not secure) between your computer and the server. This is a tell-tale sign that it’s trouble.
This is the domain name, like “bbc.co.uk“, “fedoraproject.org” and “google.com“. This is the most important bit. The best way to read this is actually from right to left. The most right hand part, “pl“, is the top-level domain (TLD). pl is the TLD for Poland. tw is the TLD for Taiwan. ru = Russia. And so on. For reference, you can find a list of TLDs here: http://en.wikipedia.org/wiki/List_of_Internet_top-level_domains
The next two bits should really indicate the organisation of the originating email. digl is meaningless; it’s been made up by a scammer to probably infer “digital” or something like that. Likewise, gl is also meaningless.
A meaningful alternative would be cahoot.co.uk, as it is registered with a UK TLD and represents the claimed originator of the message.
The last bit of this link is what’s called a port number. The (optional) use of this by scammers is again a visual distraction which makes it harder to read the real web address. Apart from the fact that no bank would ever request your details by email anyway, if they were credible they most certainly wouldn’t use a web address with a non-standard port number.
The best thing to do when reading an address is to ignore the port number but be aware of the fact that it’s been used.
For more information, check out this PDF on avoiding email scams.
And for those who were paying attention and spotted the deliberate mistake, well done! 🙂

Today is Document Freedom Day. To celebrate, many of us open source netizens are doing the right thing and rejecting email attachments sent in proprietary formats, such as Microsoft Word, Excel and Access – 95, 97-2003 and so on.
The campaign is quite simple: refuse locked-in file formats.

The Free Software Foundation has provided some interesting examples of “polite” rejections to send to people who have emailed an attachment with a proprietary file format.
It’s a difficult thing, to tell someone that you are rejecting their attachment through choice. You fear that it comes across as being awkward. Breaking the social “norm” and standing for something you believe in is rarely painless.
There are ways to deal with this though, and the best way is probably humour. It’s a serious message, yes, but that doesn’t mean it has to be all haughty overtones and morally correct principles shoved in people’s faces. Making it funny will make it stick just as well.
Here are a few of my suggestions for handling your email rejections with a bit of added spice. It’s a safe assumption that your friend uses Microsoft Office, so you could include this link at the end (http://www.sun.com/software/star/odf_plugin/get.jsp):
And of course, you MUST MUST MUST include a link to the Document Freedom Day web site, or to the Free Software Foundation, or to the Electronic Frontier Foundation, or to the Open Rights Group, or …
Links:
Thanks for watching!
I recently found myself having the need to revoke an old certificate. The steps are actually quite straightforward, but you do need to have your old revocation certificate to hand.
For more info, visit the GNU Privacy Guard site: http://www.gnupg.org/gph/en/manual.html
Simple follow these steps. In a terminal, issue:
That’s it!