There is a growing trend amongst internet companies – i.e. those organisations who provide services over the internet which store your data – to proclaim your freedom and control over your data. Sometimes, the reality doesn’t quite bear up.
I have decided to write an ad-hoc series of blog posts treating this subject. My main area of focus will be how to use readily-available tools to help you liberate your data and regain control over it.
Keep an eye on my series, at https://dowe.uk/tag/data-liberation – and subscribe by email if you want to be kept up-to-date with the latest posts.
Initial plans
The main subjects I am planning to write about at this stage revolve around the current internet/mobile ecosystem and what you can do to live a productive life while maintaining security.
My outline of topics so far:
Unlocking your saved passwords from Google Chrome, the internet’s darling web browser
Using a free office suite to replace expensive, proprietary vendors’ offerings
Getting to grips with your own web account
– why do this? Benefits? – How to set up? – Basic steps for maximum security
Using your own internet calendar and contact list, rather than letting your data be snooped on by the easier alternatives…
Secure P2P file sharing – no, it’s NOT ILLEGAL!
As well as these practical how-tos, I’m also intending to cover the bigger picture in a few supporting articles:
Leaving the “safety” of Windows/MacOS behind. Addressing some misplaced fears.
Risks of the “walled garden”
Get back in control
– what YOU can do to ensure your rights are not being violated – being pro-active and helping in the community
With writing in mind…
If you would like to suggest ideas or subject areas that you would like covered, please get in touch.
Although Google Chrome is a very fast browser, it lacks one key feature which seems designed to lock users in – any account migration facilities to support moving to other browsers. This post is intended to help you move your saved passwords from Chrome to Firefox.
While following the instructions in that post, take note of these steps below before you close your browser. If you have also set up a separate encryption password for your browser, don’t worry – this method still allows access.
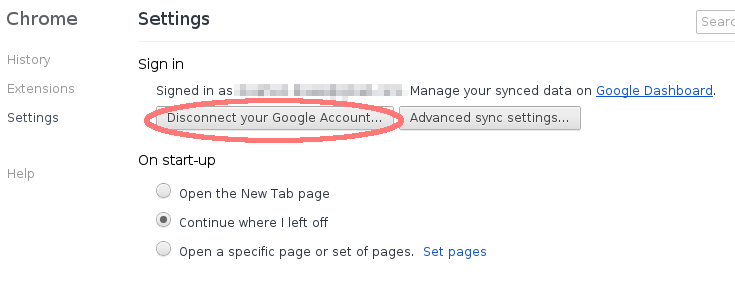
Disconnect Google account in Settings
In Chrome settings, as a precation, I disconnected my Google account before closing the browser. Therefore, any changes I could make to this temporary session wouldn’t ever be uploaded back to Google.
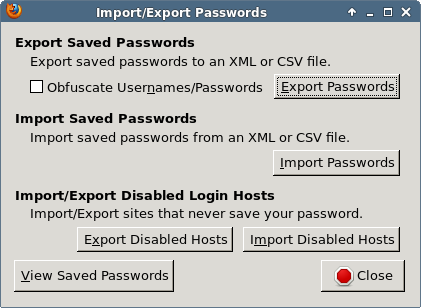
Password Exporter allows you to import passwords too, so you can avoid the need to install any third-party workarounds like LastPass (which again require you to upload all your browser data).Firstly, though, using Password Exporter in Firefox (Tools > Add ons … Extensions > Password Exporter > Preferences), we can export a sample CSV file to see how Password Exporter expects its import data. Simply click “Export Passwords” and save the file to your home directory.
NOTE: This requires that at least one password is saved in Firefox already.
We need to match up the firefox CSV headings with the corresponding Chrome CSV headings. To do this quickly, use a spreadsheet tool I used LibreOffice Calc.
Once the fields are mapped, there’s a couple more important steps to undertake.
Export in the right format!
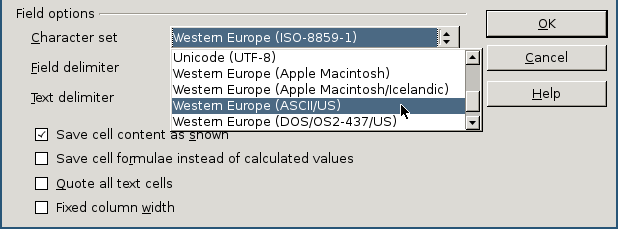
Firstly, when you come to exporting from your spreadsheet application, make sure you choose to edit the output filter. In the Export Text File dialog, make sure “Quote all text cells” does not have a check (tick) in the box.
For good measure, I also selected ASCII/US in encoding type, as that is the format used by Password Exporter when exporting. I think the importer should handle ISO-8859-1 and/or UTF-8, but your mileage may vary.
Now export it.
Remember seeing the additional header in the exported CSV file? It might have looked something like this:
# Generated by Password Exporter; Export format 1.1; Encrypted: false
In order to tell Password Exporter what format to expect its data in, this heading needs to be added back. However… the best way to do this is via a text editor, not in a spreadsheet program.
Open up GEdit, Emacs, Vi… whatever. Add that line to the top, but remove any trailing commas! It should now look like this:
# Generated by Password Exporter; Export format 1.0.4; Encrypted: false
"hostname","username","password","formSubmitURL","httpRealm","usernameField","passwordField"
One more step before you import!
A side-effect of exporting your CSV in LibreOffice is that empty cells are not quoted. In other words, the comma-separated values may appear like this:
Did you see those two commas with nothing between? The Password Exporter won’t like that when trying to import, so do a quick search-and-replace:
Search for ,, and replace with ,””,
Finally, save the file. Again, ENSURE the file type is US/ASCII.
Successfully importing passwords!
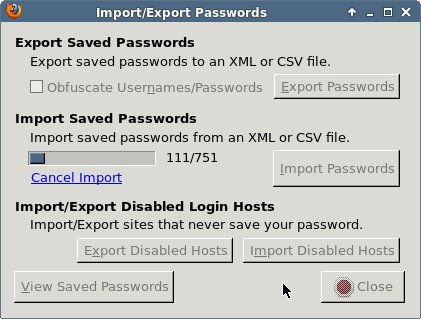
Now open up the Password Exporter dialog from Firefox and click Import Passwords – you should see progress in the dialog shortly.
CAVEAT #1: BUG WHEN IMPORTING v1.2-EXPORTED DATA
There is an import bug when the version header is declared as 1.1. However, you can get around this by “fudging” the import header to an older version (I used 1.0.4). If you have trouble importing, adjust your header in the file to look like this:
Enough was enough. I rocked and rolled along with one mainstream distribution after another, since I started using GNU/Linux in 2000. It was time for something else. Something that wasn’t trying to be everything.
Even I was slightly surprised then that, knowing so little about it, I chose Slackware Linux as my next distribution.
Here are some rough-and-ready notes from my installation, in case they’re of help to anyone else.
INSTALLATION
To install on an encrypted drive, I followed Juan Valencia’s blog:
Apart from the natural modifications expected, i.e. kernel versions, the instructions were completely sound and the installation proceeded without issue.
INITRD KEYMAP
One LILO was installed, and the system rebooted, I had two issues:
The USB devices attached to my ThinkPad’s docking station weren’t activating at boot time
The keymap of the initial ram disk was set to US, so to decrypt my drive I had to observe the alternative placement of certain characters… 😉
To resolve these issues, I found the “IT Debris” blog (amusingly sub-titled: “Nothing lasts, nothing is finished, nothing is perfect”):
To the command line (mkinitrd -c -k 3.2.7 -f ext4 -r /dev/vgl01/lvroot -m usb-storage:ehci-hcd:usbhid:jbd2:mbcache:ext4 -C /dev/sda2 -L -u -o /boot/initrd.gz) I added the flag “-l uk”, which loaded the UK keymap by default into the initial ramdisk.
Not forgetting to run lilo afterwards!
LILO’S KEYMAP
LILO’s keymap was also set to US. I decided to take a look at this. While the documentation is pretty comprehensive, the instructions for this particular issue were met with a slight problem – the file locations and names had changed in the 13 years since the documentation was written.
keytab-lilo is the recommended tool for updating LILO’s keyboard mapping.
keytab-lilo expects a US map and the other map (in your language, that you want to use) in order to create a mapping between them.
According to the docs, as referenced in /usr/share/doc/LILO…/doc/README’s web link, keytab-lilo expected keyboard mappigns in /usr/lib/kbd. This directoty doesn’t exist, so I did this:
.. FINALLY, edit /etc/lilo.conf in your favourite editor:
emacs -nw /etc/lilo.conf
boot = /dev/sda keytable = /boot/uk.ktl
NOTE: the remapping doesn’t seem perfect. The hash (“pound” in en_US) symbol (#) is mapped to two keys and the UK pound (£) symbol is not mapped to number 3 at all, but in the main this is a usable UK mapping for me.
AND.. THE SYSTEM KEYMAP!
Edit /etc/profile.d/lang.sh, adjusting from en_US to en_GB
POST-INSTALL STUFF
After this, there were a couple of issues which I wanted to resolve. When using Ubuntu, I recall there was an issue with using a ThinkPad T420 (my machine) and possibly other ThinkPads with audio output via the docking station‘s analogue port. The issue was also addressed in a Ubuntu forum post.
I created /etc/modprobe.d/t420.conf and added the following:
options snd-hda-intel model=thinkpad
options iwlcore led_mode=1
.. then rebooted. Perfect – audio came up as expected. The flashing LED still appears to be flashing, though, so this requires further investigation.
A long trip arouind the documentation and understanding how bash is invoked made me realise that the easiest thing to do is go into XFCE’s Terminal preferences, and tick the box that says “Run Command as login shell”. Then I get my nice prompt with my login, hostname and path instead of just “sh-4.20$”.
PSEUDO SUMMARY
These are my first steps at installing and configuring Slackware Linux. So far, so good. And not a single crash, which is what I expect from a sensible GNU/Linux distribution.
I recently came across the dreaded owncloud login loop. This surprised
me a little, as I hadn’t performed a software upgrade or otherwise
changed any configuration parameters for a while.
So why the change?
One lesson I have learned long and hard through developing web sites and
testing, is that there are two components which are equally
important: program code and data. Never assume there is
something wrong with your code; your live data (or test data) could be
equally at fault, causing your application to slip up.
In the case of ownCloud, I found that my hosting environment had reached
its quota. Although ownCloud could create session files in /tmp, it
couldn’t write data to them. Perhaps the code should have handled this
more gracefully, but it’s safe to assume that a cloud environment has hard disk space in order to save its files. That’s what it’s
there for, after all.
So here’s a quick, work-in-progress checklist to ensure your ownCloud installation has the
best chance of working correctly:
PHP Sessions should be enabled
session.save_path in php.ini should point to a valid (writable)
filesystem location
Storage space on hosting environment should be ample
I was so happy recently to unpack my brand new Motorola RAZR HD. It’s a lovely device. Wonderfully built, with a 4.7 inch 720p screen, replete with Gorilla Glass, and backed by a rubberized kevlar weave. The aluminium strip separating the two, running around the edge of the phone, provides a premium feel.
Or, at least, this is what I was led to believe from various reviews.
In reality, what you have is a beautiful brick – with good battery life. Android 4.1.2, the operating system shipped with the phone and modified by Google/Motorola Mobility, to ensure the phone is quite unusable, provides an amazing experience – if you connect up your Google account.
The Empire Strikes Back
What happens if you don’t have a Google account, or if you’re unprepared to create one?
What happens is that the software on the phone may refuse to play nicely with other software you choose to install. Here are some examples of this obnoxiusness:
Phone set-up
Before even seeing the home-screen, you are prompted to log into your Google account – or create a new one. You decline.
You are reassured that it’s a really good idea to create a Google account, otherwise you’ll “miss out”.
Resolutely, you continue. You get to the home screen. Then you want to install something from the Android Market (sorry, “Google Play”). You now cannot avoid creating or using a Google account.
Contacts
The phone is still behaving as though you are not fully connected to Google. Therefore, your data storage is predominatly on the phone only.
However, you might want to check this in ‘Accounts and Sync’ (which we’ll get on to in a sec)
You have the option of synchronising your data off elsewhere, away from Google’s servers. The CardDAV Sync software on Google Play provides the vehicle for doing this*. You download and install it, set up the sync with your CardDAV server, and sync away.
You might find that some of the software from Google updates on your phone during this time, now that it has access to the market.
All good… but, you soon come to realise that you cannot add new contacts to your chosen sync location. Take the scenario where you receive an SMS from an unknown number. You try to add the contact from the SMS, and can only do so to local storage.
Worse still, your only option to alleviate this – the only sync location you can add contacts to is – that’s right, a/your Google account.
If you delete your Google account on the phone, you then find that you cannot sync your contacts anywhere, because you cannot specify a default Contacts Store in the Contacts app.
Calendar
The same is broadly true of the Calendar. If you are not sync’ed with a Google account, the only calendar you can use on the phone is the built-in phone calendar. You cannot use another, third-party calendar as the default store or synchronisation copy.
If you create calendar events on your phone without a Google account, even though you have other accounts which provide full calendar syncing capability, you will still be creating an event on the local calendar that has no synchronisation counterpart
During the course of writing this article, strangely the option appeared in my calendar to utilise alternative calendars when creating an event. We shall see if this persists..
Accounts & Sync
This section has become a total mess in Jelly Bean – especially in Motorola’s implementation.
You start at the home screen: swipe down (or across from left-to-right) to get to Settings (the cog symbol)
In Settings, you scroll down the list to the Accounts section. Hit CalDAV or CardDAV.
You are then taken to the respective app’s account information with a link to Edit account settings. Let’s hit that.
The screen scrolls again to another black screen showing the same account, the settings of which you want to change. Yet another tap on this…
.. and hey presto, you’re finally in! Here you make changes and then hit the back key.
… and then hit the back key…
… and then hit the back key…
and then you’re at Settings again, so..
… you then hit the back key…
…and you’re out! (seriously, was this actually DESIGNED?!)
Going the other way into the apps settings (sorry if this is too painful for you) you first hit the Apps shortcut:
Hit the CalDAV or CardDAV icon
You then have the option: “Add account”, or “Go to accounts & sync”. Let’s say I want to edit an account, I’d choose “go to accounts and sync”..right? I tap it.
Oh, then there’s a pop-up style interface with ALL of your sync accounts. So I have to find my CalDAV app in the sync accounts list and tap on it…
Then I can see the calendar account I want to sync. But how do I edit it? When i tap on it, it synchronises! Ahh, wait, there’s a menu/settings button (the one with three squares). I tap on that…
… and get the options “Sync now” or “Remove account”.
So, let’s get this right: to EDIT my app’s data, I go to Settings > Accounts & Sync (not to the app). And when I want to SYNC the account or DELETE it, I go to the app! That’s logical!
In summary…
Android is an open source ecosystem that encourages vendors to produce lock-in experiences which are frustrating, dysfunctional and unintuitive.
And to think I was pro-android this time last week. I suppose I still have the t-shirt. The retailer will soon have the phone back, though.
bootnote
*CalDAV sync and CardDAV sync are both great pieces of software that fully get my support (and have done, in the financial sense). I use them here as examples of good apps which are potentially made almost impossible to use by the restrictions imposed by Android OEMs.
Quite simply, I am very happy to be back in Emacs-land.
There I was, thinking that the web-based task managers, to-do lists, etc
were “all that”. Well, ok, I do feel that some are pretty good, as you can tell from
my tag cloud on this blog. But nothing ever felt like it was native to
me, this keyboard and this computer.
I wanted to put tasks on a computer to make them easier to manage. Putting them on a web site didn’t do that, and I don’t think it ever
really will for me. So I’m back in the saddle with orgmode and boy, am I loving this again. It’s amazing how the keystrokes just come back to
you.
This is a blog post for personal interest and probably not of much amusement to others.
My work machine has a fresh install of the (soon-to-be released) Debian version 7 (codename “Wheezy”). There are a couple of modifications I’ve had to make to the installed software to get things working as desired.
Firstly, I’ve read really good things about mu4e – the “maildir-utils for emacs” email client. (Just for clarity, the author of maildir-utils has abbreviated its name to mu.) mu4e provides an interface to your email in emacs which is fast and efficient. I like things that are fast and efficient.
I installed debian’s standard mu and mu4e packages, but found that mu (the wheezy-based package) was not indexing all of my email. Firing up mu4e within emacs then trying to browse the ~/Maildir/INBOX – and being told there were no messages – raised some suspicions! So I removed that package and installed from source instead and, now, indexing works much better.
how to do this
Basically, it’s pretty simple. Just:
# apt-get remove mu4e
This will replace maildir-utils (0.9.8) and mu4e. Then download the mu-0.9.9.5 source (list of mu releases) and follow compilation and installation instructions from its install page.
On Debian, this will result in you installing mu and mu4e to /usr/local/share instead of the default installation point, /usr/share. To enable the use of /usr/local/share/emacs/site-packages/mu4e/ from within your standard emacs23 install, just create a symlink pointing to it from /usr/share/emacs/site-packages/ :
(Edit) I also installed gnu tramp for Emacs from source, but the reasons why I originally did this now escape me, as tramp has been part of Emacs for a while.
unrelated issues
I have found a worrisome issue in wheezy. When I attach an eSATA drive to my ThinkPad (T420) and copy lots of data – e.g. GBs of photos – to my ~/Pictures, I get some kind of kernel panic/X error. I’m still investigating this at present.
I will attempt to keep this list updated as I continue getting this set-up just as I want it 🙂
[ EDIT 10 April 2012 10:00 ]
Grabbing the currently stable, newest kernel source (ver 3.8.6) and compiling it in the debian way has seemingly fixed this crashing/locking issue.
I was recently asked to explain the difference between setting permissions on a directory to either 755 or 751.
In 751 mode, a user who isn’t the owner and isn’t in the group assigned to that directory can still execute anything within that directory, provided they know the name of the executable file. They are unable to browse the contents of that directory to find the name. Therefore, 751 is inherently more secure than 755.
The funky, geeky bit
For reference, each number of 7 5 1 is an octal representation of the number of permission bits set on the file/folder. There are 3 bits per field.
Taking the 7, from 751, this means all bits are set to 1. This is how it works (think of it like a lookup table):
meaning: r w x (read, write, execute)
bit value: 4 2 1 (< - this is the octal lookup bit)
bit set to: 1 1 1 == 4 + 2 + 1 == 7.
If you take the value 5, then this is how that’s set in the bit fields:
bit set to: 1 0 1 == 4 + 0 + 1 == 5.
Remember, there are three fields! So each field – the “owner”, “group” and “others” fields – contains the sum of permission bits set for that field. The “751” is actually a nice, easy way to see permissions. The actual permissions set in a 751 situation are, in binary “nibbles”, 0111, 0101 and 0001.
Demo – try it yourself!
As root, set up a test dir in /tmp/ called test, with 751 perms. Then create a file within that called hello.sh which simply outputs “hello” on the command line when executed. To achieve that, simply do this (as root, remember):
# mkdir /tmp/test
# touch /tmp/test/hello.sh
# chmod +x /tmp/test/hello.sh
Then edit /tmp/test/hello.sh and put these two lines in:
#!/bin/sh
echo Hello
/tmp/test is owned by root (rwx / 7) , has the root group (r-x / 5) and the "world" just has execute (--x / 1). When using your own user account, trying to do a # ls /tmp/test - should tell you that permission was denied.
However, you should be able to do # /tmp/test/hello.sh which outputs "Hello" as expected.
If you bump that world permission to r-x / 5, you would be able to see that file because ls has the necessary permission to read the directory contents.